How To Make A Wet-Mount Slide
If your microscope is gathering dust in a storeroom or cupboard, why not take it out, dust it off and prepare some homemade slides.
To make your slides at home, you’ll typically only use a wet-mount slide or dry-mount.
We’re going to focus on the wet-mount slide in this article and give you all the details you’ll need to create a wet-mount slide for your personal use at home.

How To Handle Slides
Before we break down what you’ll need to prepare your wet-mount slides, let’s talk in general terms about how you should handle slides. Here are a few tips you might find helpful:
When you pick up or move your slides, always wear gloves and hold the slide by the edges.
Don’t grab the slide in the middle, or you’re going to leave your fingerprints behind, and I doubt they’re going to be more interesting than the specimen you have lined up.
After use, you want to put your slides away carefully. The last thing you want is for slides to get damaged or scratched.
So now we have that out of the way; let’s get started making some wet-mount slides.
What Is A Wet-Mount Slide?
When you use a wet-mount slide, you suspend the specimen in a drop of liquid, which is typically water. The drop of water with the specimen is positioned between the top of the slide and the cover. The water will improve the image quality and supports your sample.
A wet-mount is not a long-term or permanent mount because the water will evaporate over time; therefore, this type of mount is often referred to as a temporary mount.
Different Types Of Wet-Mounts
While there different types of liquids for use with wet slides, the most common is water; other liquids such as glycerin (glycerol) and immersion oil are two others.
You must consider your water source; for example, if you observe a living specimen, you should try to ensure the correct osmotic potential if you don’t want to ruin your sample. Having too much salt in the water will make the specimen lose too much water, while not enough salt will probably result in your specimen bursting.
If you are viewing water organisms, for instance, ciliates or algae, it’s far better for the water to come from the samples.
Should you be observing molds or bacteria, then water from a natural habitat wouldn’t be possible. Some bacteria are far too dense to observe unless you dilute them considerably. To overcome this issue, you can add 9 grams of table salt to one liter of water, which will offer an excellent osmotic potential.
However, if you’re observing non-living specimens, it’s okay to use tap water. For example, specimens such as grains of sand, plant material, or dust samples are not osmotically sensitive. The problem is observing this type of material in a dry condition may affect the image resolution.
As I mentioned, you can use other liquids for different types of specimens; immersion oil is one such liquid. Typically immersion oil is put on top of the cover to prevent a sample from touching the oil. Some specimens can be mixed with the oil, such as heat-fixed bacteria; in this case, no cover is necessary. For observing specimens at lower magnification, you would use a cover.
Any type of specimen that tends to float in water and create bubbles should be observed in immersion oil under a cover.
Finally, I mentioned glycerin. This can either be pure glycerin or glycerin-water mix. Glycerin can remove water from samples and acts as a preservative but will also cause the specimen to shrink. Water organisms are susceptible to dehydration; however other types of specimens, for example, plant material, are not as sensitive.
The advantage of using glycerin is the materials’ high refractive index; this would be highly advantageous for viewing some structures. You can also mix glycerin with water if the subject you’re viewing doesn’t require such a high refractive index.
Methods And Materials For Wet Mounts
Materials For A Wet Mount
- Microscope slides
- Specimens: Ensure the specimen is small enough. If the specimen is too thick, you’ll need to slice it much thinner.
- Water: As I mentioned earlier, check the osmotic potential to ensure the compatibility of the specimen. For example, use the same pond water as the specimen, do not use freshwater with marine samples or saltwater for freshwater samples.
- Droppers and pipettes: (essential for placing water on slides)
- Cover glasses:
- Tweezers: (for handling specimens, cover glasses, and adding water)
Method For Using A Wet Mount
When you’re going to observe a specimen that is already in some fluid, for example, algae, then you can use this method:
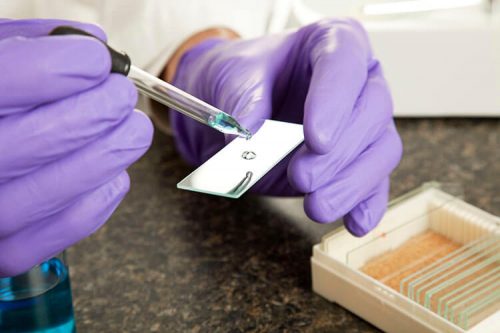
- Place a small drop of the specimen fluid that contains the specimen onto the middle of the slide.
- Carefully hold the slide by the edges, or you can use the tweezers if you’re more comfortable that way. Place a cover glass over the liquid at an angle and lower the cover glass on top of the liquid. Be careful to perform this part slowly enough, so you do not create air bubbles.
- If fluid leaks out onto the slide, remove it with a tissue.
- The cover glass should adhere to the slide because the surface tension will hold it in position.
When specimens are not already in liquid:
- Take your slide and put a small drop of water in the middle of the slide.
- You then place the specimen into the water.
- To ensure the specimen is totally underwater, add a little more water from your dropper on top of the specimen; to prevent bubbles from forming between your specimen and the cover glass.
- Take hold of the cover glass by the edges, place one edge on the slide at an angle and slowly lower the cover glass onto the slide; once again, you must avoid air bubbles.
- If any water leaks out onto the slide, you can wipe it clean with tissue paper.
- Ensure the cover glass is held firmly in place by the water’s surface tension; if not, you’ll need to add a little more water.
Conclusion
The advantage of using a wet slide mount allows you to view living organisms without drying out the specimen. The disadvantage is the time necessary to prepare a wet mount slide.