Microscope Reticle
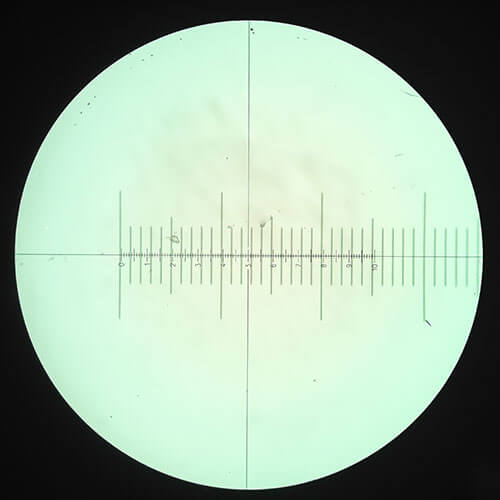
A microscope reticle is a transparent round piece of glass with a measuring scale etched along the centerline. Reticles are also known as eyepiece micrometers.
The reticle or eyepiece micrometer positions in the inside of the microscope’s eyepiece at the focal plane and, in doing so, enables the viewer to measure specimens accurately.
If the viewer or user of the microscope has a stereo or binocular microscope, they will only position a reticle in one of the eyepieces, not both. A Reticle must be the correct diameter for the eyepiece lens for it to fit and work properly. To ensure the reticle/ eyepiece micrometer doesn’t move around, which would make taking measurements virtually impossible, the user would also need to employ a reticle retainer ring.

Fitting The Microscope Reticle
To correctly position the microscope reticle is a demanding procedure. It isn’t that the installation of the reticle is complicated. But if the viewer happens to attract dust or dirt to the reticle because the reticle sits directly on the focal plane, every time the viewer looks through the eyepiece, dirt or dust will impair the specimen’s view.
In modern microscopes, the eyepieces (oculars) can accept a reticle. They sit inside and at the bottom of the eyepiece. We refer to the eyepiece’s part inside the microscope’s eye tube, which is also part of the microscope.
For the microscope’s eyepiece to accept a reticle, two things are necessary. You will need to ensure they are present in the microscope you are using. The best way to do this is by removing the eyepiece from the microscope’s eye tube, turn it over and look at the bottom of the eyepiece.
After doing this, you must see a type of ledge or shelf that the reticle will sit on. As well as the stop or frame, you should see some kind of retaining system that will hold the reticle in the correct position.
The stop or shelf is crucial because this is how the reticle is directly positioned on the focal plane in the eyepiece lens. The stop shelf ideally positions the reticle to be automatically in focus when you view it through the eyepiece.
The system to retain the reticle is usually a threaded ring that you screw into position from inside the eyepiece. You would need to unscrew the retainer and take it out of the eyepiece first, then pop the reticle inside the eyepiece, screwing the retainer back in position to secure the reticle safely.
To accomplish the retainer’s removal, you will need a tool, probably a small spanner wrench or a tiny flathead screwdriver.
Sometimes microscopes have the stop shelf already in the eyepiece but no retaining ring. So you would need to purchase a correctly sized C-ring. Without the C-ring, the reticle will not remain secure and make it challenging to use it.
If you cannot see the eyepiece’s stop shelf, this is because of one or two situations. Either the microscope’s eyepieces you have purchased don’t allow for reticles, or the microscope’s eyepieces employ a different way of holding the reticle in place. There are eyepieces available that enable a reticle to be fixed between two lenses and not at the eyepiece’s bottom.
If none of these methods are available, it would be best to refer to the microscope’s user manual or contact the manufacturers, if that’s at all possible.
Remember to ensure you are removing the reticle retainer carefully; sometimes, it can be a little confusing, which is the retainer and the ring securing the lens elements in position.

Reticle Diameters And Varieties
Reticles are available to purchase in different diameters and various styles. They have to be because not all eyepieces are the same size, and a lot will depend on the user’s personal preference of eyepiece micrometer.
The typical reticle is a solid line and can be somewhere in the region of 1mm long and with 100 divisions. Generally, they will have a dissecting vertical line at 5mm. But there are other popular choices such as a circular pattern, square grids, and a simple solid cross line.
If you have seen a particular variety you prefer, and your microscope manufacturer doesn’t offer that one, you can look online and see if you can find what you want. There is a vast selection of custom reticles. You will need to be 100% certain of the reticle diameter you need to ensure it fits your eyepiece correctly.
Calibrating Each Objective With A Stage Micrometer
To accurately measure microscopic samples, an eyepiece reticle and a stage micrometer are necessary tools. As we mentioned at the start, the eyepiece reticle is a transparent circular glass disc with precision measurements etched into the surface.
Both the microscope reticle and the eyepiece can rotate 360 degrees within the eye tube; this enables the measuring scale to be precisely positioned above the object to be measured. The typical eyepiece reticle will be up to 100mm long with 100 divisions.
It’s essential to calibrate the reticle using a stage micrometer. Generally, the stage micrometer is a one-inch by three inches slide with a set of dimensions on the slide.
The user will position the stage micrometer onto the microscope’s stage and bring the slide into focus. Rotating the eyepiece enables both the stage micrometer and the eyepiece reticle to become parallel to each other.
Establishing the eyepiece reticle’s calibration requires that the number of intervals on the eyepiece reticle exactly match a certain distance on the stage micrometer. You are then in a position to calculate one interval of the microscope’s reticle.
Every microscope objective must go through this calibration procedure separately. When you calibrate each objective, make a record of the results, you don’t want to do this time and again. If you calibrate a stereo zoom microscope, you must calibrate every time you change powers.
Conclusion
Typically microscope owners have a separate eyepiece lens for their microscope reticle; this enables them to use an eyepiece without the reticle; all they need to do is switch out the lenses.


