How To Prepare Microscope Slides
While it’s fantastic checking out the microscopic world around us, what would make the experience even more worthwhile and fulfilling is if you knew how to prepare microscope slides.
Of course, it’s less time-consuming if you purchased ready-to-use microscope slides, but I’m pretty sure it wouldn’t give you the same feeling of satisfaction.
Many people don’t know precisely how to prepare slides, and you might be one of those people. If you are, this article will give you the information you need to prepare your microscope slides; if this is something you would like to learn.
After reading through this article, I’m sure you’ll be able to prepare microscope slides as well as the next person, or even better.

Purpose Of Microscope Slides
To examine single-cell organisms, small plants, and other types of organisms, you’ll need a microscope. However, to hold the samples in place and enable light to pass through the samples, they need to be held in place on a microscope slide.
There are two specific types of prepared slides used for this purpose, dry mounts, and wet mounts. Each type of slide is designed for mounting different types of cells. Sometimes when you’re wet mounting a specimen that you cannot see particularly clearly, such as a pale or translucent specimen, it may be necessary to stain the specimen; otherwise, you wouldn’t be able to see it visible underneath the microscope.
How To Prepare A Dry Mount
Choose A Clean Microscope Slide
Select a slide and, holding it by the edges, hold it up to the light; you’re making sure there are no fingerprints or other dirt and dust on the slide. Typical slides are rectangular and flat on the top and bottom.
Slides need to be completely clear to allow the microscope’s light to pass through the slide and illuminate the specimen you are studying.
Any dirt or smudges or fingerprints will ruin your opportunity of getting a clear view of your specimen. You must wash the slide with soap and water to remove any contamination on the slide if you find any; dry the slide only with a clean cotton cloth.
Specimen Inspection
Specimens must be transparent or at least semi-transparent to allow light to pass through them. If, for any reason, light is blocked and does not pass directly through the specimen and into the microscope’s eyepiece, you will not see the specimen.
Depending on what you’re attempting to view will determine if you need to slice the specimen; some specimens are thin and transparent, for example, an insect’s wing, and do not require slicing.
Slice The Specimen
Using a dry mount is the simplest and easiest slide to prepare because you do not need to use liquid between the specimen and the slide. Use a dry mount for specimens that will not dry out such as, flower petals, insect legs or wings, feathers, hair, or fur.
As we mentioned, transparent or semi-transparent slices of your specimen are necessary to obtain a clear view of the specimen. Using a razor blade for this, you will be able to slice thin enough specimens for light to pass through them.
Position The Specimen Onto The Slide
Because the specimen is so thin, you’ll need to take great care, use forceps to pick up your sliced specimen, and gently position it onto the slide (it doesn’t matter which side), unless you have a specimen that you fear might roll off the slide, then use a concave slide to ensure this doesn’t happen.
If your specimen is not going to roll off the slide, then use a flat-sided slide.
Use A Cover Slip
A coverslip is an ultra-thin piece of glass (nowadays, it’s more common for coverslips to be plastic), approximately 3/4-inch square.
The job of a coverslip is two-fold. One, it prevents the specimen from slipping off the slide. Two, the coverslip prevents any harm from coming to the sample if a user lowers the microscope’s lens too much and inadvertently damages the specimen.
You now have a fully prepared dry mount slide ready for inspection under your microscope.
How To Prepare A Wet Mount
Place A Drop Of Water On The Slide
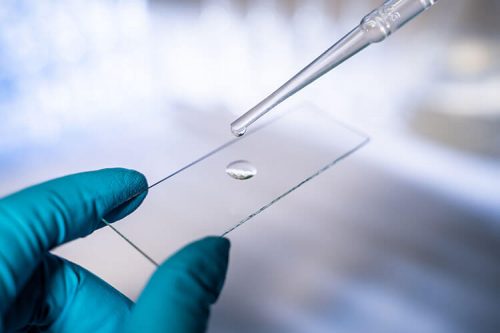
Inspect your slide and ensure there is no dirt or fingerprints on the slide. You can use a concave or flat slide; it’s up to you. Position a drop of water in the center of the slide using an eyedropper. The mount takes its name because you’re using water on the slide.
You need the water to ensure the organic sample your viewing doesn’t dry out under the microscope lights. The water will preserve any living organisms you’re viewing, for example, single-cell organisms.
If you want to create a permanent slide of dead organic material, you can substitute the water for clear nail varnish.

Prepare A Wet Sample Specimen
Wet mounts typically feature living or organic materials. You can use a toothpick or razor to cut or scrape to generate a small piece of your wet specimen. There are some common materials used for creating wet mount slides, such as:
- Human cheek cells or plaque from your teeth.
- Take a plant stem and cut a thin cross-section with your razor blade.
- Single-celled organisms such as amoebas or paramecium will require a different method of collection. Easily the quickest way is to find water where you know algae or single-celled organisms swim and use a clean-eyedropper to suck up one or two drops.
Position Specimen Onto The Slide
How you place the specimen onto the slide depends on what the sample is. You can use anything from tweezers to a toothpick. If you’re studying single-cell organisms, use the eyedropper to drop a couple of drops into the water already on the slide.
Whatever tool you use to transfer the sample, ensure you place the specimen directly into the center of the water on the slide.
Place A Coverslip Onto The Slide
Once you place your sample into the water on the slide, place a coverslip over the top. Now position one edge of the coverslip onto the slide next to the water. You should gently lower the other edge of the coverslip until it rests on top of the sample. The pressure from the coverslip will spread the drop of water outwards until it reaches the edges of the coverslip.
Do not exert any pressure on top of the coverslip, or you will damage the specimen.
Conclusion
If you want to know how to prepare microscope slides, this article will provide all the information you’ll need to prepare both dry and wet mount slides for your investigative future.


